


To register custom page builder widgets for translation you need to use the wpml-config.xml file. Follow this tutorial to learn how to use it.
This guide is for developers who build themes and plugins or add custom page builder code to their site.
If you use a third-party page builder and can’t translate the custom widgets on your website, please contact WPML support.
Page builders like Elementor, Beaver Builder, SiteOrigin, and Cornerstone come with a suite of their own widgets. These default widgets work seamlessly with WPML.
Sometimes, you may create custom widgets intended for use with these or other page builders.
A custom widget is any unique, additional widget that doesn’t come bundled with a page builder. These can be created by your development team, third-party developers, or come from other plugins and themes.
A custom widget is also any widget that comes from add-on plugins developed specifically for a page builder, like Elementor, by external developers.
When do I need to register custom widgets for translation?
You need to register your custom widget for translation:
- If it’s a widget not originally provided by a page builder
- If you created and added it through another plugin or theme
- If it’s developed for your WordPress websites or a specific page builder by your team or third parties
In the past, the most common way to register custom widgets for translation was using custom PHP code. Now, you can easily register the widget for translation using wpml-config.xml, WPML’s configuration file.
Registering custom Elementor widgets for translation in WPML 4.9+
In WPML 4.9 and newer, WPML automatically recognizes custom Elementor widgets and makes them translatable. However, it may register strings that you don’t want translated.
That’s why we strongly recommend you still manually configure the wpml-config.xml file as described on this page. This gives you control over which fields are translatable.
How to Register Custom Elementor Widgets and Gutenberg Blocks for Translation Using the Multilingual Tools Plugin
Our Multilingual Tools plugin includes a WPML – Config Generator for Elementor and Gutenberg blocks. This feature allows you to add any custom Elementor widgets or Gutenberg blocks you want to register for translation to a page. It then automatically generates the first version of XML code you need.
Learn how to register custom Elementor widgets for translation and how to make Gutenberg blocks translatable.
How to Find a Widget’s Registration Information
To be able to register a custom widget within the wpml-config.xml file, you first need to find some basic information about it: the name of the widget’s type and the names of the fields you want to translate.
Add the widget on its own to a new page and save the page. Elementor stores the page’s widgets in the _elementor_data post meta field, and a plugin like JSM Show Post Metadata shows that field in a metabox at the bottom of the page editor, so you can read the widget’s data there.
In that data:
- widgetType is the name to use in the widget’s name attribute.
- The keys under settings are the widget’s fields. A key that holds a text you want translated, such as title, is a field name to register.
- A repeater field holds an array of rows. The key that holds that array, such as contents, is the “items of” name.
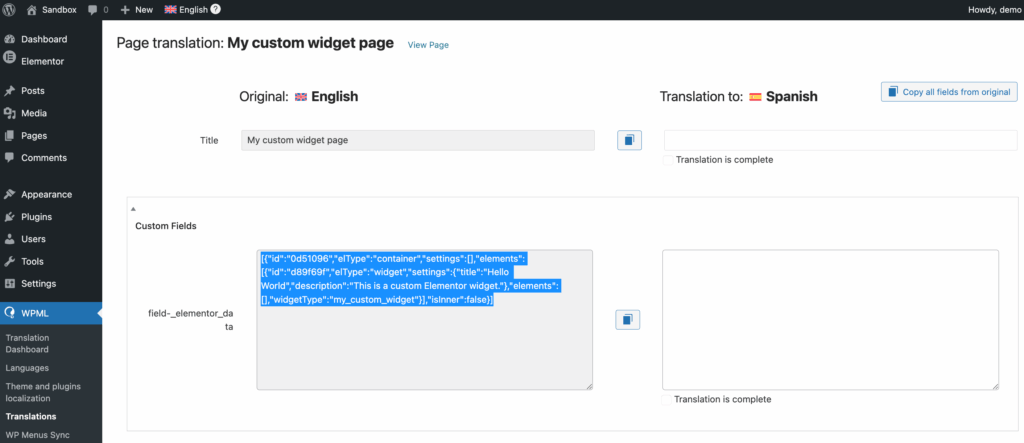
Once you have this information, you can proceed with actually registering the widget for translation.
To check your work, open a page that uses the widget in the translation editor. The fields you registered show there by name, with the widget’s texts beside them. A widget that is not registered contributes nothing to the job, so if none of its texts appear, the registration has not taken effect.
Registering Simple Widgets
The following video walks you through an example of registering a simple Elementor widget:
The following example illustrates how to register a simple widget. A simple widget here means that the widget has no repeater fields.
<wpml-config>
	<elementor-widgets>
		<widget name="heading">
			<conditions>
				<condition key="widgetType">heading</condition>
			</conditions>
			<fields>
				<field type="Heading" editor_type="LINE">title</field>
				<field type="Heading: Link URL" editor_type="LINK">link>url</field>
			</fields>
		</widget>
	</elementor-widgets>
</wpml-config>
Let’s go through the structure of the given example:
- Start with the
<elementor-widgets>tag. This tells WPML which page builder widgets you are going to register. It can be one of these:<elementor-widgets>: this must be used if you’re using Elementor, Elementor PRO or any other Elementor addon.<beaver-builder-widgets>: this must be used if you’re using Beaver Builder Lite, premium Beaver Builder or any other Beaver Builder addon.<siteorigin-widgets>: this must be used if you’re using the SiteOrigin page builder.<cornerstone-widgets>: and this one must be used for Cornerstone page builder that comes with X theme or PRO theme.
- Add your widgets:
<widget name="widget_name">where widget_name is the name used to register the widget in the page builder.<conditions>(optional): under conditions, you add a condition with a key equal to the widget name. It can be used when the widget name is different from the widget key in the data, but it’s usually not needed.
- Add the fields of the widgets, wrapping them in a
<fields>tag:- field: The id of the field. This is the same as the id used when adding a control via the Control_stack::add_control function.
- type (optional): The type of field. This is the text displayed in the WPML Advanced Translation Editor or Classic Translation Editor to help the translator know what field is being translated.
- editor_type (optional): This is the type of text field used in the WPML Classic Translation Editor. Valid values are LINE, AREA, LINK, and VISUAL. It defaults to LINE if missing.
- key_of (optional): This is only used for <field> tags that have an array inside a <fields-in-item> tag.
You can use these elements to register a simple widget with any number of fields.
Registering Fields with Post or Taxonomy IDs
In the section above, you learned that the type attribute is typically used to display descriptive text in the Translation Editor.
However, when your widget fields store post IDs or taxonomy IDs (such as selected images, related posts, or chosen categories), you use special values that trigger automatic conversion:
type="post-ids"– for fields containing post IDstype="term-ids"– for fields containing taxonomy/term IDs
When you use these types values:
- The field won’t appear in the translation editor
- WPML automatically converts the IDs to point to the corresponding translated content
- Both single IDs and comma-separated lists of IDs are supported
Example:
<wpml-config>
    <elementor-widgets>
        <widget name="the-widget-name">
            <fields>
                <field type="post-ids" sub-type="attachment">image_id</field>
                <field type="post-ids" sub-type="post">selected_posts</field>
                <field type="term-ids" sub-type="category">category_filter</field>
            </fields>
        </widget>
    </elementor-widgets>
</wpml-config>
In this example, the optional sub-type attribute specifies the exact post type or taxonomy being converted:
- For
type="post-ids": usesub-type="attachment",sub-type="post",sub-type="page", or your custom post type slug - For
type="term-ids": usesub-type="category",sub-type="post_tag", or your custom taxonomy slug
Adding sub-type improves performance by avoiding extra database queries to determine the content type.
For more examples, see Elementor’s configuration file and search for post-ids.
Registering Widgets with Repeater Fields
The following video walks you through an example of registering an advanced Elementor widget with repeater fields:

For the widgets that have repeater fields, you need to wrap the fields in <fields-in-item items_of="tabs"> tag (where tabs is the name of the widget with repeated fields). Check out this example:
<widget name="accordion">
	<fields-in-item items_of="tabs">
		<field type="Accordion: Title" editor_type="LINE">tab_title</field>
		<field type="Accordion: Content" editor_type="VISUAL">tab_content</field>
	</fields-in-item>
</widget>
In some cases, the widget can have multiple repeater fields. Consider the following data structure from the Table widget from Ultimate Addons for Elementor as an example:
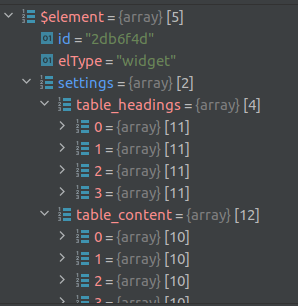
To register this widget, please see the following example:
<widget name="uael-table">
	<fields-in-item items_of="table_content">
		<field type="The Cell text" editor_type="LINE">cell_text</field>
	</fields-in-item>
	<fields-in-item items_of="table_headings">
		<field type="The Heading text" editor_type="LINE">heading_text</field>
	</fields-in-item>
</widget>
Registering Widgets with Both Simple and Repeater Fields
Note, widgets can have both types: fields and fields-in-item. Check out this example for a widget that uses both:
<widget name="price-table">
	<fields>
		<field type="Price Table: Heading" editor_type="LINE">heading</field>
		<!-- ... -->
	</fields>
	<fields-in-item items_of="features_list">
		<field type="Price table: text" editor_type="LINE">item_text</field>
	</fields-in-item>
</widget>
Grouping Fields for Better Organization
To improve the clarity and organization of your XML configuration, you can prefix field labels with the group name. Consider this example of a hotspot widget:
<widget name="hotspot">
    <fields-in-item items_of="hotspot">
        <field type="Hotspot: Label">hotspot_label</field>
        <field type="Hotspot: URL" key_of="hotspot_link">url</field>
        <field type="Hotspot: Content" editor_type="VISUAL">hotspot_tooltip_content</field>
    </fields-in-item>
</widget>
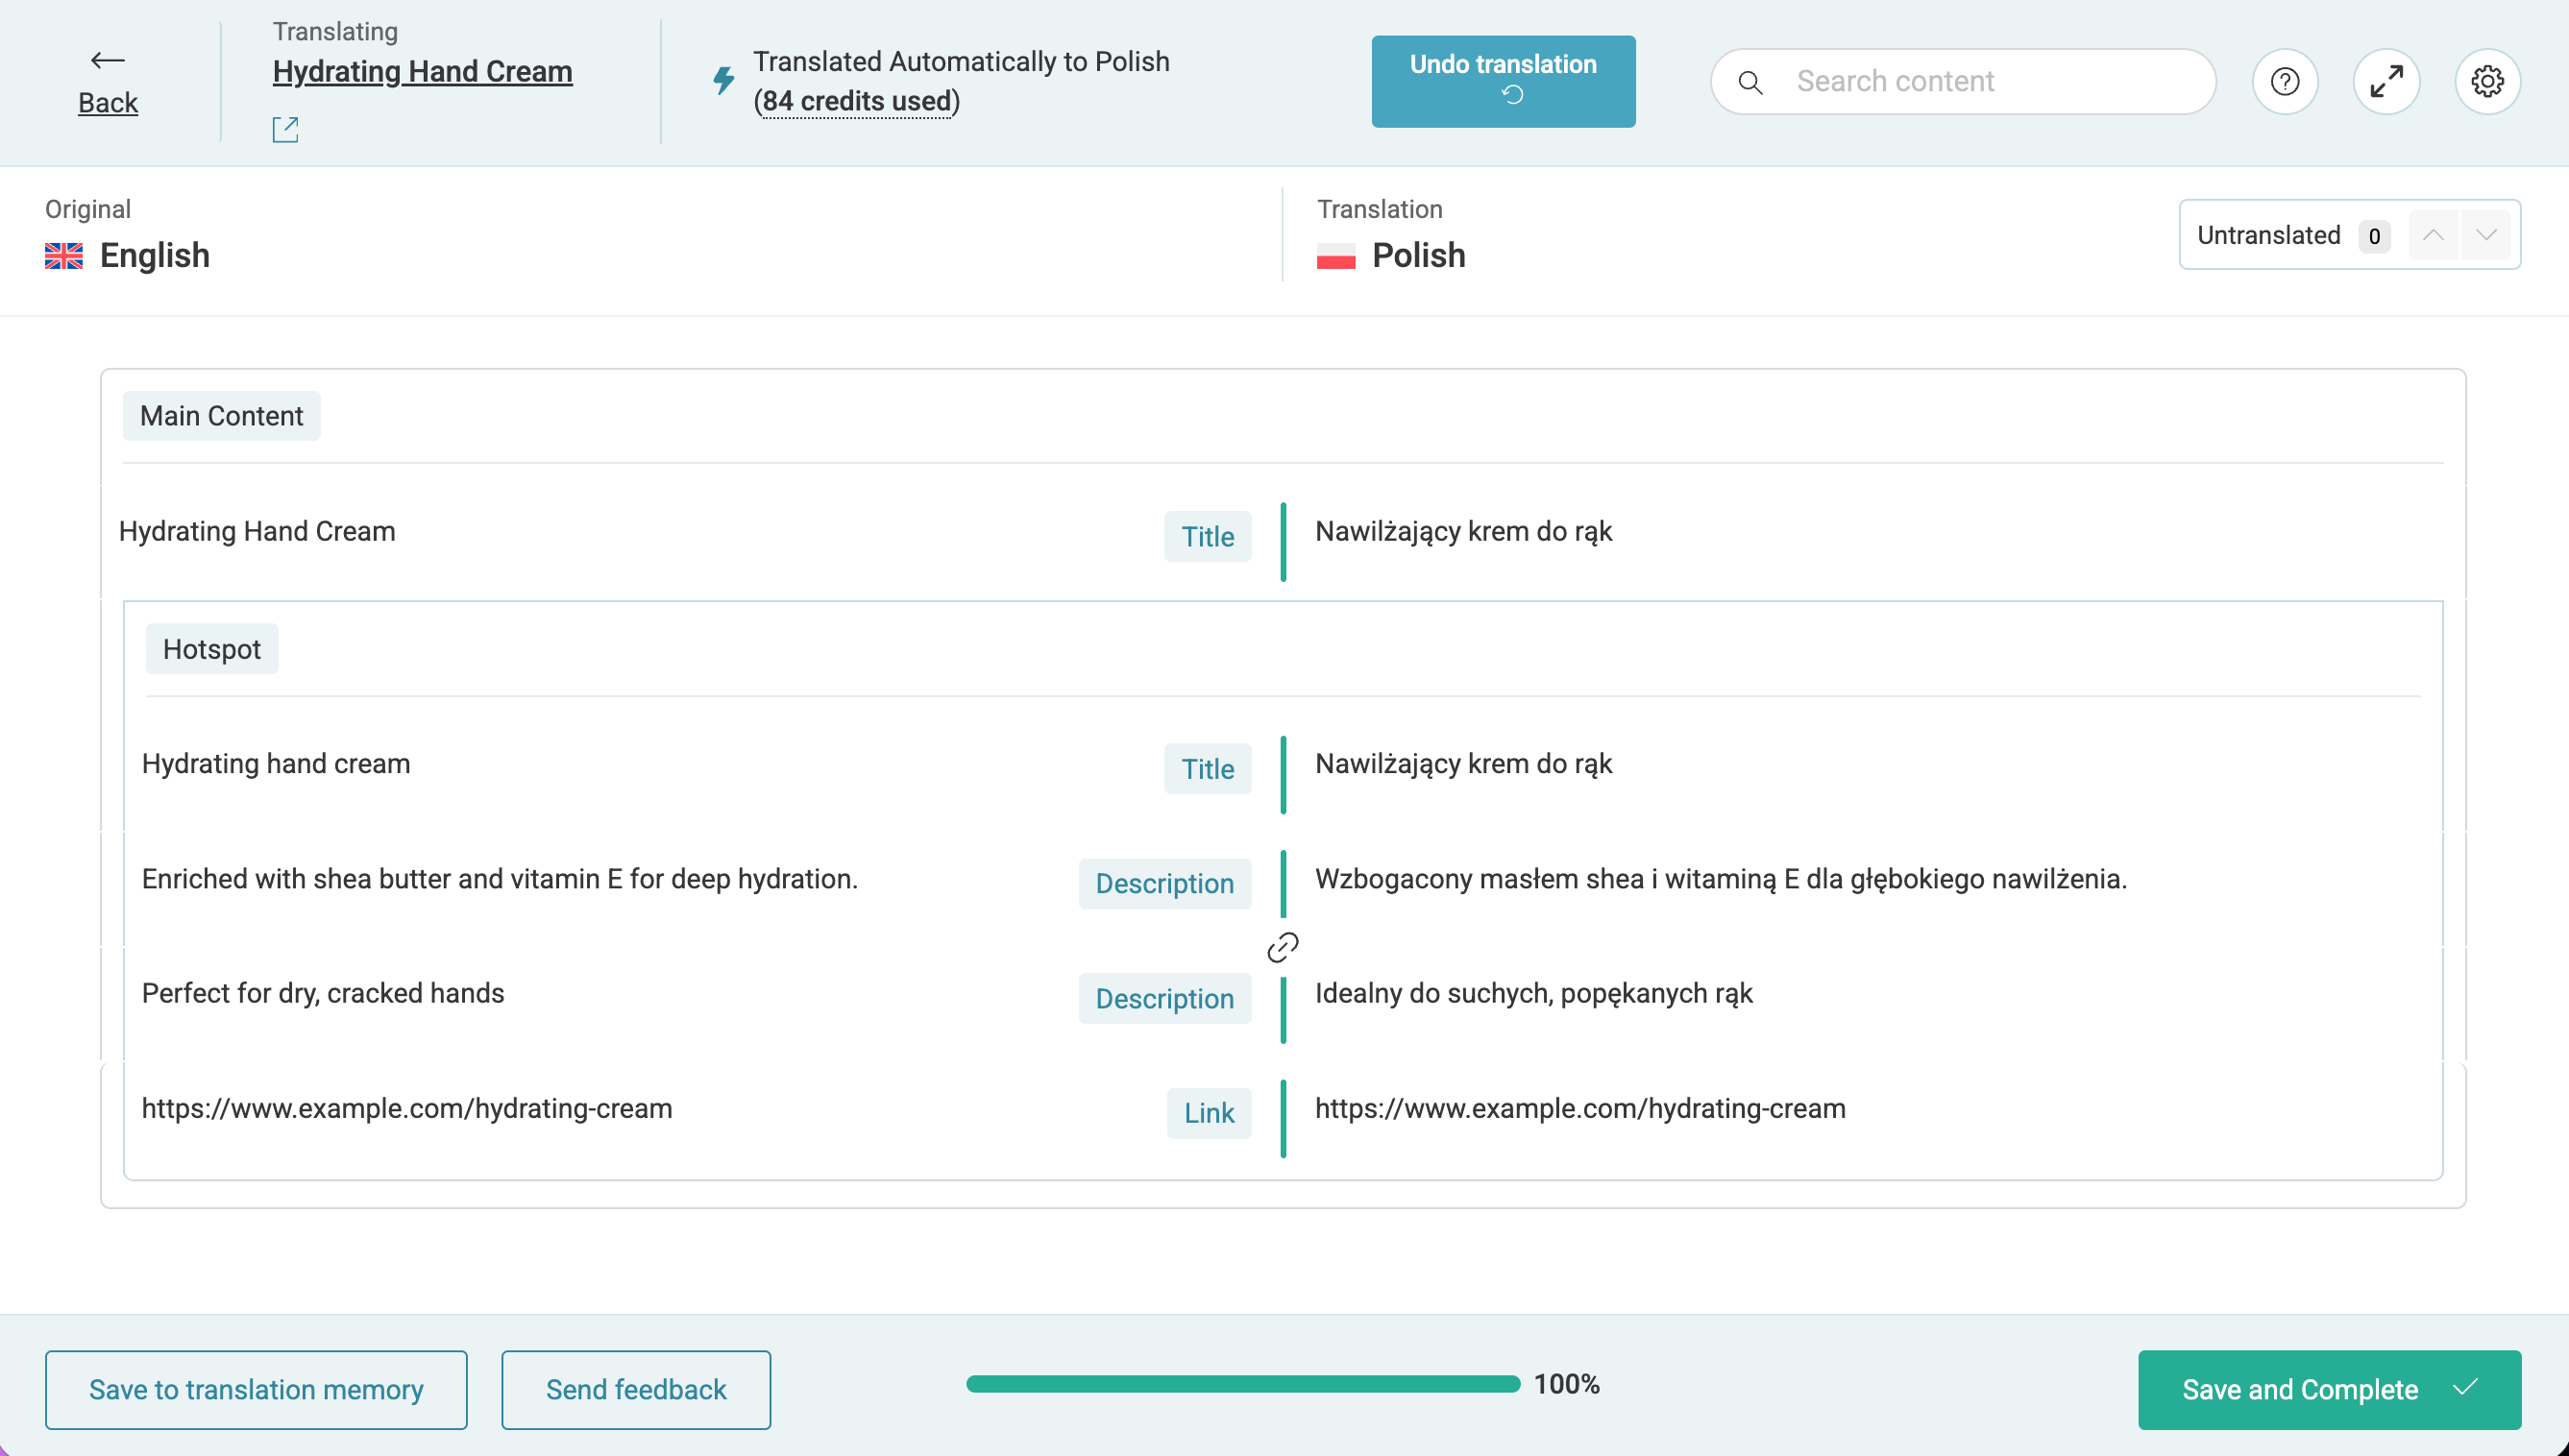
Here, each field of the hotspot widget is prefixed with the Hotspot: label. The prefix keeps the configuration file readable, but WPML does not carry it into the Advanced Translation Editor: the translator sees the widget’s fields grouped together and tells them apart by the text each one holds.
Registering Other Types of Page Builder Content
See our documentation on registering page builder content in your language configuration file for more on registering strings, shortcodes, and more.
Additional Resources
To learn more about the wpml-config.xml file, visit the Language Configuration Files guide.
For customizing other elements using the wpml-config.xml file, visit our additional guides:
- Register Page Builder Content for Translation
- Translate Custom Shortcodes with WPML
- Set Translation Options for Custom Fields Using WPML Configuration File
- Register Custom Terms, Types & Taxonomies as Translatable
- Make Custom Gutenberg Blocks Translatable
- Translate Texts that Theme and Plugins Save in wp_options
- Customize WPML Language Switcher Using WPML Configuration File